Getting Started with a Safety Razor
Posted on
One of the first zero-waste swaps that I made was with my razor – and it was scary! My husband had gotten into “old fashioned shaving” a few years ago – the shaving soap dish, the brush, straight razors, fancy creams – the whole bit, really. Luckily he could explain a lot of it to me. There was hardly any information on the internet for a woman using a safety razor that I found to be really useful; everything was marketed to guys shaving their faces. Hubs could show me how to put the razor together, the angle to shave with (sort of) and all that, but I really needed more than that. I finally found a youtube video by Christina Sedona (a gal I highly recommend - she’s so funny, down to earth, and inspiring) and that helped. But seriously, even now, a year and a half later, it was tough to recruit some new razors to my store and have any sense from the pictures that were posted as to what type of razor it was, and whether it used standard blades, etc. One brand just had pictures of the razors being held by a bunch of girls in their underwear. So helpful!
So! Here’s all the details I can muster up to get ya started. There’s a few things you may want to think through to make it work for you so that this switch can stick before jumping in.
Why Switch to a Safety Razor?
Honestly, this switch has been great, once I got past the habit changes required. I wasn’t used to needing to replace a blade every so often (I'd just grab a new razor) or remembering to bring it into the shower with me when I wanted to use it (I just left the hunk of plastic in there because I really didn't care about it). I also was a very lazy shaver and using soap with shaving was a tiny bit of extra work, as well.
Obviously, I was excited about the sustainability factor here - one razor for the rest of time. Everything involved is infinitely recyclable. No plastics or plastic waste.
Awesome.

But, I also really, really hated buying razors. It felt like a mortgage payment for what I was getting, and there was nothing out of it at the end for me – sure, I had shaven legs, but it all just went in the garbage and my hair grew back and then I had to buy them all over again. Razor blades are extremely expensive for a short term use item – they are even locked up at retail shops! What?! So, the appeal of spending a few dollars a year on blades after the initial purchase of my razor was very seductive. The razors in the shop cost as much as some of the packs of razor blades to last you like six months. And, these razors all come with at least 5 blades, so the cost savings catches up pretty quickly.
I didn’t realize until I started using the razor (and had pretty much committed to this swap in my mind, unless it was crazy hard to do) that it was a better shave than what I had been used to all these years. And, I didn’t actually cut as easily with this thing - that was very unexpected. Generally the worry with this switch is the danger associated with the razor blades and shaving in this fashion. I really expected it to be scary and a bloody mess. This didn't end up being true for me, and on top of this unexpected outcome, I no longer experienced ingrown hairs and razor burn. This little buddy became essential after that. Five years in, I still haven’t had any issues with ingrown hairs or razor burn. I’ve saved the waste, and experienced a bunch of personal benefits, such as the feeling of “better not more” quality in my every day items; a better shave; the simplicity of less to store in my bathroom, smoother skin, and more money. If there’s a switch you’re going to put the effort in to make, this is it.
Choosing a Razor
In choosing a razor, understanding the different styles will help you determine what's best for you. The "rookie" butterfly razor is a little less scary, because it can’t exactly fall apart in your hands when you’re opening and shutting it. The razor blade is easy to drop down inside. The razor opens and shuts with a little twist on the bottom of the handle, so the fingers are nowhere near the blade. The other standard style (of which we have a few types to offer) involves placing your fingers on either end of the top (that houses the blade) and twisting it. The blade is sandwiched between two metal pieces, so this can get a little dicier when you’re adding or removing a blade, but is easier to clean and rinse hair off of.
The first razor I shaved with was my husband’s butterfly razor, but ultimately I ended up with the standard. It’s not so tough when you’re out of the shower, installing a new blade, but if you ever need to rinse the blade off in the shower, this makes things a little trickier. You really only need to do this if you’ve allowed your legs to get pandemic-level hairy, and therefore hair build-up happens in the razor. I used to just bang my plastic razor on the shower, but I guess I’m a little more respectful of my safety razor that I’m not going to do that with a hunk of metal. I’ve always been fine and not cut myself, but that’s the biggest difference that I can determine between the two styles, anyway. The standard style has a lower risk of a mechanism breaking (like that of the interior of the butterfly razor to operate the opening mechanism), and therefore a potentially better long term investment, which is why I went with the standard type.
Stainless steel is the sensible option for a safety razor. I just love stainless steel, really – it’s right up there for me with wool and beeswax and bamboo for sustainability. It is a highly valuable recyclable material, so you can actually recycle this thing if you ever broke it or needed to be done with it (which really, the idea is to keep it for the rest of your life). Stainless steel can be scratched and not have rust pour out of the scratch, because it is purely stainless steel underneath, not a mixed metal cheaper alloy with a coating that would allow for rust to come through if the surface were scratched. This is helpful in the wet environment of your shower; more on that to come.
And finally, to totally switch gears into a different type of reusable razor altogether, is the Leaf pivoting head razor. A very significant difference in learning to shave with a safety razor is to adapt to the fixed head and allow the razor to glide or slide along the skin; the Leaf is more akin to the conventional razors sold in shops with a pivoting head and multiple blades. The Leaf is also a plastic free option with stainless steel blades, but you're able to fill it with individual blades and shave with it in the same way that you might be more accustomed to with a more conventional plastic razor. The Leaf is an investment to begin with, but highly durable and simple to use; you can even use safety razor blades to fill it (there are plenty of videos online showing how to make this work), if you aren't keen to buy their specific blades.
Razor Blades
When I started out, I tried out a variety pack of razors from Fendrihan, a men's shaving company. My husband also had a bunch of blades leftover. Different companies make their blades in different locations and they are all just slightly different in their sharpness, so a variety can help you figure out which is best for you. This idea might apply to some people that are a little more detail-oriented than I am; I didn't actually notice a difference in any of them. I honestly just found them all to be pretty great. This may not be the case if you’re shaving your face and you’re more particular, but they’ve all worked out well for me.
Now, in terms of packaging, they are not all the same. Some include exterior plastic wrap, like the wrapping on gum or cigarettes, which is really very unnecessary. Some have a plastic case frame on every set of 5 blades, which is useful afterward for nothing and just ends up as microplastic waste. The ones that just come wrapped in paper and cardboard were Rockwell Razor blades, Shark blades and Astra blades. I’m into keeping the unnecessary waste away, so I won’t be rebuying the others (like Wilkinson Sword). They might have been good blades, but had a lot of unnecessary packaging.
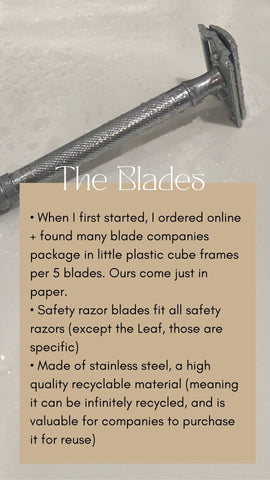
Safety razors have a standard blade, so no stress on using different blades; they should all fit.

The blades are part of the sustainability of this switch, and dealing with them looks a bit different. Ages ago, before the dump and recycling centres existed, people disposed of their discarded razor blades in a slot in the wall. In renovating old homes and buildings, caches of rusty razor blades have been found in the walls. The interesting thing about steel is that it can be left for decades in, say, the woods, and then it can be dragged out and still would be worth recycling into new steel. Plastics can only be recycled one time (and require more plastic to be added to it to complete the process) and have low reuse rates because it's not a highly valuable recycled material. Steel, on the other hand, can be infinitely recycled over and over, and that recycled material is extremely valued for reuse. Almost all of the steel we use in Canada is recycled. While steel recycling has some processing impacts, it can be great in that there is a continuous, closed loop for it that exists.
The blades end up in that recycling loop. As they are not made of any mixed materials, they can be placed in your regular recycling program with metals. You can save up the blades in a blade bank (I recommend these if you have children around), or a tin can that you'll tape shut before placing it in the recycling stream.
Shaving Soap
One thing to keep in mind with safety razors is that they don’t have a ‘built in’ moisturizing or lubricating strip that many disposable razors have. Shaving soap is pretty important for the safety razor route, as without it, you can end up feeling pretty dried out with that close of a shave and no moisture. Shaving creams usually are housed in an aerosol container, and require the waste of dealing with that container afterwards; they need specific recycling in hazardous waste programs due to the contents and composition of the packaging. A shave bar of soap can start out with no packaging and ends its life with no waste at the end. The product can go down the drain without worry or fear for the lasting effects its ingredients could have on the environment and your septic system.


There is also the option to use shaving oils, which are so lovely, but I couldn’t make the price point stick for me. The bars are very reasonable and last for quite a few shaves. The bar can be held in one hand with the razor in the other, and work well on the face and elsewhere on the body. I lather up the bar on, say, my lower leg, and then just shave that part of my leg before starting my knee section, etc. One thing to note is that your shaved hairs do end up on this soap bar, so if that's an uncomfy thing, oil may work best for you! Keeping the bar up off of the shower surface helps it to last longer and keeps you from needing to clean the goo up that soap naturally leaves behind, if allowed to sit in water. Oil can be housed in a vessel without those issues and can be intensely hydrating.
If you're shaving your face, lathering the bar directly onto the face can work, or with a shaving brush. You can also use a shaving oil or natural oil from the refillery after washing your face in a thicker layer prior to shaving, which can be soft and hydrating on more sensitive skin.

Using a Safety Razor
Here’s the thing – you’re probably going to be so scared to use this the first time that you really need to plan ahead and let yourself have the time to take it slow the first time you dive into this. Soon you’ll feel just as comfortable as with your regular razor. Even with this acquired comfort, I have cut myself far less than with a disposable razor.
The instructions I found most useful in approaching safety razor shaving were to use it on a 30 - 45 degree angle, and to do shorter strokes to start out with to figure it out. There were lots of suggestions to lather up the area with shaving soap first. This was good advice, I still do all of this.

Storage + Accessories
A safety razor takes a bit more thought for storage than a regular razor. Really, who cares about their disposable razor? It can get disgusting and left behind in the shower, because it will be gone soon, right? It's not a keeper; it's only in your life for a month, max.
I had to start the new habit of putting my razor in the shower when I was going to shave, and taking it out after. This may sound annoying. However, I was also learning to do the same thing with my facial soap bar, so it’s not really a big deal after you do it a few times. Once you forget once and have to get out of the shower, dripping, ya’ll likely not do it again, right?! If you have the option in your own bathroom, you can also leave it in the shower if it can dry out well between uses and isn't sitting in a pool of water. The razor will survive, but the blades will rust and need to be replaced, and you may find you'll need to clean your razor more often to remove the rust from the blades.
Another way of storing your razor is upright in a mason jar (or other pretty cup), and add a little leather sheath to cover the top once you’ve dried it off a bit (if you worry about knocking it). The sheath is also awesome for travelling with your razor. If you're only using the razor to shave your face outside of the shower, we have some stands to hold both your razor and your shaving brush in order to keep it safe and dried out well.
Cleaning/Maintaining your Razor
If you make sure your razor isn't left sitting in a puddle in the shower, you don’t really have much else you need to do. I don’t even physically dry mine off after a shower, I just take it out to air dry.
About twice a year, I put my razor in a bowl of rubbing alcohol for a minute. Then I rinse it off and just go ahead with life and it’s all good! You can use cleaning vinegar, or boil the razor in hot water, or wipe it down with a safe bleach if you're inclined, as well.

And there you go! Let me know if you have any questions, and I'll update the blog!
- Tags: Plastic-free shave shower
0 comments